马上注册,下载丰富资料,享用更多功能,让你轻松玩转阳光石油论坛。
您需要 登录 才可以下载或查看,没有账号?欢迎注册
x
本帖最后由 SISpeiying 于 2015-12-24 10:28 编辑
『Petrel RE使用技巧』修改局部网格的数模属性而不影响地质属性
Petrel RE中Grid Property Modification(GPM)允许用户在不改变地质模型属性条件下,在数值模拟对应的Case进行网格属性修改。在历史拟合、不确定性分析及优化过程中,应用灵活而方便。
1. 修改整个模型的属性 Processes面板Simulation下双击打开Grid property modification,即可创建新的Property modifier set。Formula下可选取编辑公式,以下依次可选择需要修改的属性及系数。  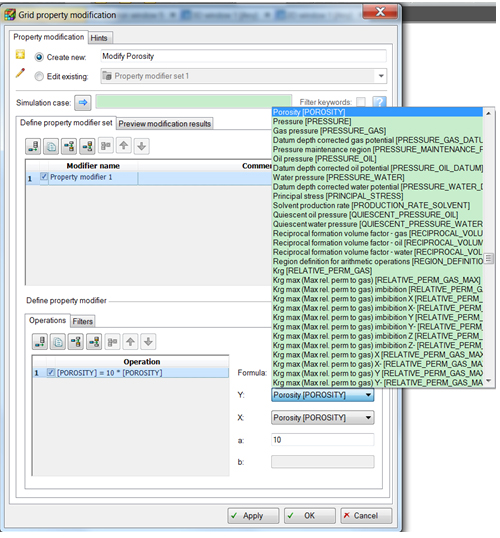 Simulation case栏指定需要修改属性模拟的case;在Preview modification results面板下Create modified properties,这样在Models面板该数模case对应的模型下Properties下多出一个Case name + Grid property modification name的文件夹,可在3D/2D窗口查看修改后的属性。 同时,Input面板Property Modifer保存了当前Pretrel工程下对各个Simulation case全部修改内容。 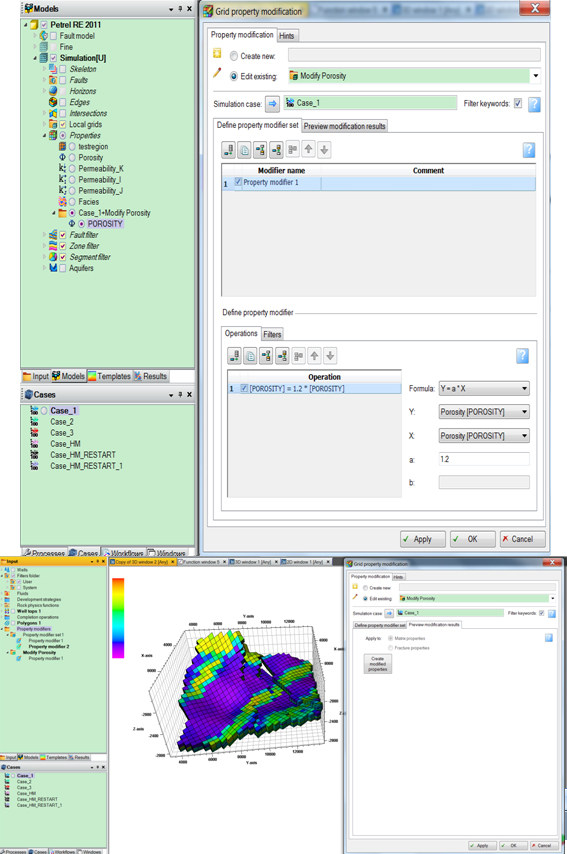 双击Define simulation case,Grid 标签下添加新的keyword,Property modifier set,导入input面板Property modifier下对应的Property modifier set,即可运行Simulation Case。 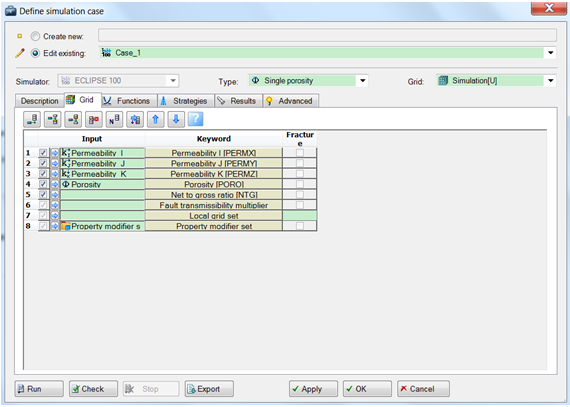 2. 修改用户感兴趣区域的属性 1) 修改坐标在某范围的网格属性,又或者,修改某属性在特定范围网格的属性值,可通过属性过滤器过滤。 用属性计算器创建一个新的属性,如Testregion。右击创建的属性,Create 1D filter。  双击Grid property modification, 设置需要修改的属性及系数后,进入Filters,选中input面板Filters folder下的上步创建的filter,导入Grid property modification,单击Apply。可查看修改后的属性。 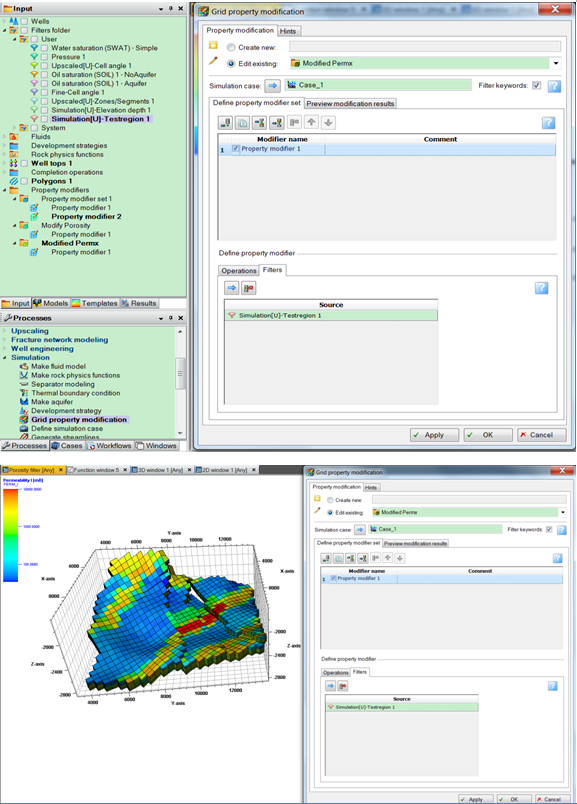 2)修改指定Zone、Segment网格属性 双击Processes面板Property modeling下Geometrical modeling,选中创建新的属性体,Method下选Segment index(或zone index),Apply。 右击Segment 属性,Create 1D filter,选中需要修改属性的Segment,单击apply创建过滤器。 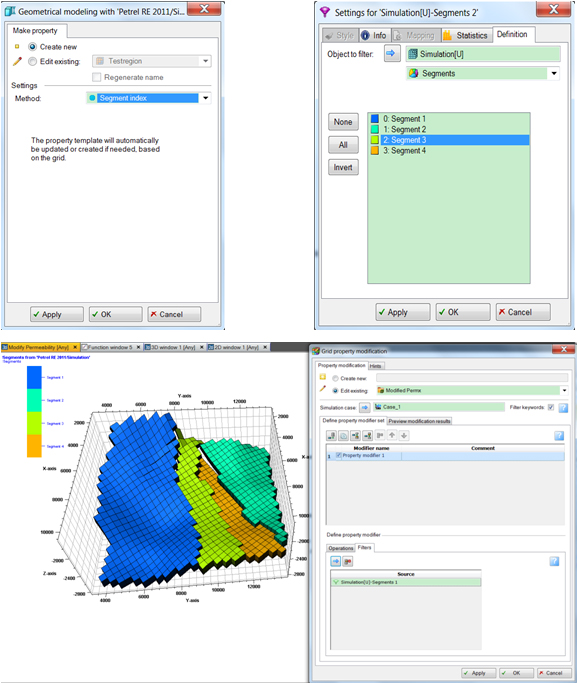 查看修改前后属性值。  3) 修改井周围网格、用户定义多边形区域网格属性 当需要修改以井为中心周围网格属性时,双击Processes面板Property modeling下Geometrical modeling,选中创建新的属性体,Method下选Well region,well中选目标井,Radius栏输入半径,Apply。 Model面板对应模型Property下计算得新的属性体,Region from ‘Well/Producers’。 右击Region from ‘Well/Producers’,Create 1D filter,选中需要修改网格属性对应的区域,Apply。 Grid property modifier导入该区域,即可完成井周围区域属性修改。  激活Processes面板Utilities中Make/edit polygons,创建新的多边形,用以描述用户想修改属性的区域。 双击Processes面板Property modeling下Geometrical modeling,选中创建新的属性体,Method选择Assign between surface and polygons, Property template栏选Region,Boundary polygon栏导入上面定义的多边形(需要修改多边形内某个/多个zone网格属性,可定义Top surface/Base surface),点Apply。 Model面板对应模型Properties里出现新创建的属性Region。Grid property modifier导入该区域,即可完成井周围区域属性修改。 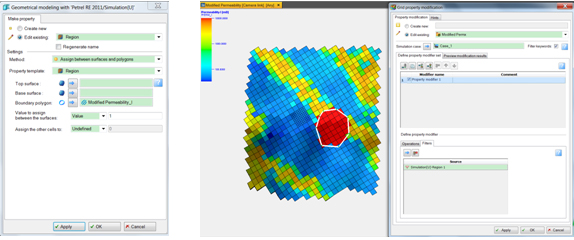 4)同一Property modifier set下定义多个区域网格,修改不同区域网格的不同类型属性 Grid property modifier同一个Property modifier set下可同时增加多个Modifier name,多是,Operations/Filters下的设置与Modifier name一一对应。 这样,用户可通过增加Modifier name,实现对于某一个case不同区域网格,分别修改渗透率、孔隙度、临界含水饱和度等属性。Comment栏可方便用户记录个Modifier name所做的修改。 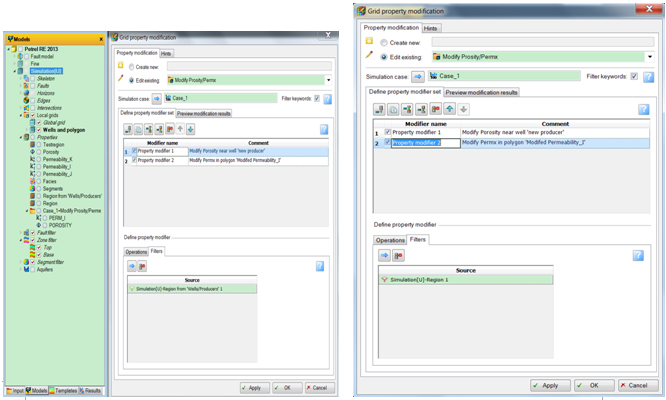
| 

 |Archiver|手机版|小黑屋|阳光石油网
( 鲁ICP备2021003870号-1 )
|Archiver|手机版|小黑屋|阳光石油网
( 鲁ICP备2021003870号-1 )

 发表于 2015-12-24 10:26:39
 置顶卡
置顶卡 变色卡
变色卡 千斤顶
千斤顶 显身卡
显身卡 发表于 2019-1-25 15:32:52